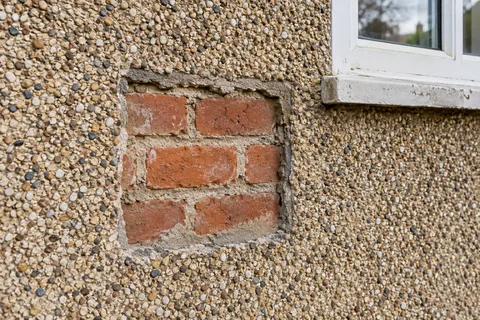
Removing pebbledash
Pebbledash removal in Hull
Pebbledash is a hard cement render with small stones or chippings stuck into its surface. To remove it, the dash and the coats behind it are broken off the wall in one, leaving bare brick or block that then needs repairing and refinishing. It is one of the messier rendering jobs, so it is worth being sure it is needed.

On this page
How a dashed wall is made
Dry dash is built in layers. A cement undercoat goes onto the brick, then a receiving coat, and while that is still soft the stones are thrown at it so they bed into the surface. JUB's installation overview for its own dash system describes a receiver of about 6mm, levelled and dashed immediately with washed aggregate. MPA Mortar's Data Sheet 04 names pebble dash among the usual finishing coats for cement render, alongside roughcast, in which the stones go into the wet mix and the whole lot is thrown at the wall.
The result is tough and needs no paint, which is why it was popular. It is also rigid. Once the backing coats start to part from the brick, the whole layer moves as a slab: it cracks at window corners, bulges near the ground and eventually falls in pieces.
- Trial area A small patch is taken off to see how well the dash is bonded and what lies beneath.
- Removal Dash and backing render are hacked off to masonry or to a sound backing coat.
- Clear and dispose Debris is bagged or skipped; this is heavy, dusty and noisy work.
- Repair the masonry Exposed bricks, blocks and joints are repaired before anything new goes on.
- New render system The wall is rendered with the chosen system, or left as fair-faced masonry if suitable.
The usual order of work. The survey and the chosen products decide the actual steps.
Is removal the answer?
Knock across the dash at intervals with the butt of a screwdriver. A solid knock all over means the coating is still bonded, and options short of removal are open. Dull, hollow areas spread across an elevation, bulges, or water getting in behind point to stripping.
If the dash is solid and the complaint is only how it looks, a masonry coating in a new colour changes the appearance for a fraction of the disruption, although the stony texture stays. Stripping is the route when you want a smooth or different finish, or when the dash is no longer holding on. Either way, ask for the hollow areas to be marked on a photograph of each wall, so you can see how much of the coating has actually failed.
| Option | When it fits |
|---|---|
| Patch repair | Small hollow or damaged areas on otherwise solid dash. |
| Coat it | Solid dash that is faded, stained or the wrong colour. |
| Strip and re-render | Widespread hollow areas, cracking or a wish for a smooth finish. |
| Strip and insulate | A solid wall being stripped anyway, where insulation is wanted or required. |
What stripping involves
Removal is slow, heavy and dusty. A trial area on a back or side wall first shows how hard the dash is to break and what is behind it.
Sheet the windows, doors and drains, and protect neighbouring walls and paving.
Remove downpipes, cable clips, lights and brackets, noting where each one goes back.
Cut a clean line where removal stops, at a corner or the party line with next door.
Break the dash and its backing off with hammer and bolster or a light breaker, working from the top down.
Bag and clear debris daily so it does not pile against the wall or block shared paths.
Brush the brick down and inspect it for damaged faces, open joints and filled openings.
Repair and repoint as needed, and let the wall dry before the next finish goes on.
What may be underneath
Owners often hope for clean brick. On a Victorian terrace the dash may hide decorative brickwork such as the lighter string courses and stone lintels described in Hull City Council's appraisal for Ella Street. It may equally hide patched brick, cement repairs and old openings filled with mixed materials. SPAB warns that levering hard render off in large sheets can seriously damage soft brick or stone beneath, and recommends testing a small area before full removal.
Even good brick usually carries scars and mortar stains after hacking off. Leaving it exposed is possible where the faces are sound, but it often needs cleaning and repointing to look right, so plan on a new render unless the brick turns out to be in good order.
Base, edges and permissions
Use the stripped wall to correct the base detail. If the old dash runs right down to the ground, it spans the DPC and gives damp a route past it, the problem the RICS consumer guide on bridged DPCs describes; its example keeps the path two brick courses, roughly 150mm, lower than the DPC. The new finish should stop on a bell-cast bead above the DPC.
A change from pebbledash to a different cladding on a house in a conservation area needs a planning check with Hull City Council. There is a separate thermal question when the dash comes off. In Approved Document L for dwellings, renovation of more than 50% of a thermal element, or more than 25% of the external building envelope, calls for an upgrade where feasible. The designer should measure the relevant areas before stripping starts. That is why a removal quotation may also include external wall insulation, together with the deeper sills and altered fittings it needs.
Common questions
Can I remove pebbledash from just the front?
Yes, if the side and rear dash is sound. The new finish stops on beads at the corners, which hides the change and keeps the edge weather-tight.
Is it possible to render over pebbledash instead?
Only over dash that is solid when tapped, and then with a thick levelling basecoat. Over hollow dash, new render inherits the old failure.
See housing and planning information for Hull and nearby places, including the source and geography behind each figure.